Last Updated on May 7, 2026 by admin
What This Is
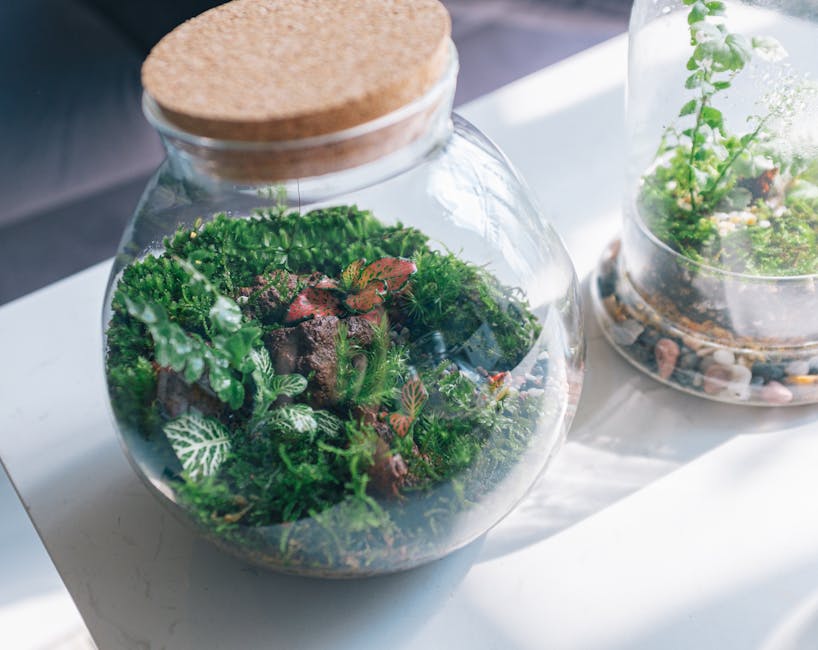
Guests pick a small glass vessel, layer in sand, soil, and pea gravel, then nestle in a single succulent or air plant and a few decorative stones. That’s it. Most people finish in 15 minutes, 20 on the slow end. The activity appeals to kids around age 5 and up, adults who’ve never crafted a day in their life, and seniors who appreciate something tactile and low-stakes. You don’t need to teach anything; the layers are self-explanatory, and the result looks great every time.
Supplies to Source (and What to Skip)
You don’t need a craft wholesaler for this. A local garden center, a Dollar Tree run, and one bulk order from Amazon will cover you.
Per-station supplies (per guest):
- Small glass vessel, 4–6 oz (straight-sided mason jars or geometric terrariums from a dollar store work fine)
- 3-inch succulent or air plant (source these from a local nursery or Trader Joe’s garden section — buy 20% more than you expect to need)
- Fine sand, white or colored, in a small ramekin
- Pea gravel or small river stones, roughly 2 tablespoons per guest
- Cactus/succulent potting mix — Miracle-Gro or Kellogg brand bagged, pre-scooped into small cups
- 1 craft stick for tamping soil
- Optional: a pinch of decorative moss, small shells, or mini figurines in a shared tray
Setup supplies:
- A plastic tablecloth (soil happens)
- Small scoops or spoons, one per material tray
- 4–6 trays for holding loose materials
- A small spray bottle of water for air plants
Skip the activated charcoal layer. It’s sold in every terrarium tutorial online, but for a 20-minute station it adds confusion and cost without a visible payoff. Guests won’t miss it.
Setting Up Your Station for High-Turnover Guests
- Cover your table with a plastic tablecloth before anything else. Soil on a display case is a problem; soil on a tablecloth takes 30 seconds to fix.
- Set up a linear flow: vessel first, then sand, then gravel, then soil, then plant. Left to right. Guests figure it out without you explaining it every single time.
- Pre-scoop soil and sand into individual portion cups the morning of the event. This is the step most shops skip and then regret — open bags at a shared station slow everything down and create mess.
- Keep a “demo terrarium” at the start of the line. Just one you assembled in advance. Guests look at it, understand what they’re making, and start without questions. I find this cuts my explanation time by half.
- Set out the decorative extras (moss, shells, mini stones) at the end of the line, not the beginning. If they’re at the start, guests grab handfuls and run out of room in their vessel.
- Plan for one station host per 4 active guests. That’s a comfortable pace. Any leaner and the soil cups sit empty; any more staff and you’re overpaying for a station that mostly runs itself.
Walk-Through for Guests
- Pick your vessel. Offer 2 shapes max — a classic mason jar and one geometric or open-top option. Too many choices stall the line.
- Add the base layer. About an inch of pea gravel goes in first. This is where kids get excited; the sound of stones hitting glass is genuinely satisfying. Good photo moment right here.
- Spoon in the sand. One ramekin’s worth, tapped gently to level it. Color choices (natural, pink, black) are where personality shows up.
- Add the soil. Fill to about two-thirds of the vessel. Use the craft stick to press it down lightly, not hard — guests always pack it too tight on the first try, and that’s fine.
- Plant your succulent or air plant. Make a small divot, set the plant, press the soil around it. Air plants just sit on top; no burying needed.
- Finish with decorative stones or moss. This is the moment people slow down, and that’s okay. It’s the creative part. Give guests 3–4 minutes here.
- Add a small care card to the bag at checkout — one sentence each on watering (once a week for succulents, mist twice a week for air plants) and light. Guests feel like they got a real product, not just an activity.
Keeping It Kid-Friendly and Senior-Friendly at the Same Time
The terrarium station works across age ranges because every step is tactile and forgiving. There’s no wrong way to layer sand. That said, a few small adjustments make the experience genuinely comfortable for everyone.
For kids under 8, swap the glass vessel for a 4-inch plastic cup with drainage holes punched in the bottom. Glass at a busy station with small children is a real risk, and the plastic version is still cute. Air plants are the better plant choice for young kids too; no soil-pressing required, nothing to mess up.
For older guests, make sure your stools or chairs are available at the station. Standing for 20 minutes is fine at 35, less fine at 72. A single stool at the end of the table means seniors can take their time without feeling like they’re holding up the line. We’ve had some of our longest, best conversations with guests who sat down to finish their terrarium.
The decorative choices — which stones, which moss, which sand color — are genuinely personal. A 9-year-old and a 65-year-old make completely different-looking terrariums from the same materials. That’s the pull of this project. It’s not just an activity; it’s a small expression of taste.
Turning One-Time Visitors into Return Customers
A terrarium is a living thing, and that’s your re-engagement hook. Tuck a small business card or QR code under the care card in every take-home bag. Link it to your website, your Instagram, or a simple page with terrarium care tips. If a guest’s succulent thrives, you get the credit.
You can also put a small “refill kit” near your register — a bag of cactus soil, a few spare decorative stones, and a second plant for guests who want to make another one at home. It’s an easy add-on purchase that costs you almost nothing to stock.
If you’re running this during Make-and-Take Week as part of the Shop Hop, the terrarium station pairs naturally with a passport stamp. Guests who complete the hop and leave with a living plant remember your shop specifically. A friendship bracelet is easy to forget; a plant on their windowsill is not.
Tips and Variations
- Buy 20% more succulents than you think you’ll need. They go fast, and running out at 2pm on Saturday is a real problem.
- Offer a “premium vessel” upgrade — a geometric glass terrarium instead of a mason jar. Charging a bit more for the nicer vessel is an easy upsell most guests happily take.
- In fall, swap white sand for black and add mini pumpkin figurines. In winter, use silver sand and white moss. The seasonal swap costs almost nothing and gives regulars a reason to do it again.
- Air plants are honestly easier than succulents for a high-turnover station. No soil-pressing, no mess, faster finish. I’d run air plant-only if it’s your first time.
- The biggest failure mode I’ve seen: pre-assembled kits laid out before the event starts. Guests bump the table, layers mix, the sand gets into the soil cups. Set everything out separately and let guests build their own from scratch.
- If you want more ideas for low-barrier, all-ages activities that run on similar principles, painted rock stations use the same “minimal supplies, maximum creative choice” logic.