Last Updated on May 12, 2026 by admin
What This Is
Guests pick a cord color and a hardware piece, then follow a laminated 4-knot pattern card to tie a boho keychain or bag charm. Start to finish: about 20 minutes. Most shops run this in 30-minute windows to allow buffer time for slower knotters. The activity appeals to teens through adults, though kids 10 and up can absolutely handle it with the right card design.
The Four Knots Every Guest Needs to Know
You don't need to teach macramé. You need to pick four knots and build everything around them.
The knots that work best for a 20-minute keychain are the lark's head knot (to mount cord onto the ring), the square knot, the half hitch, and the gathering knot to finish. That's it. Four. Guests who've never touched macramé cord in their lives can learn all four from a well-designed card in about 3 minutes.
A square knot takes 8-10 repetitions to make a satisfying chunk of texture. The half hitch adds visual interest without much added difficulty. The gathering knot at the bottom gives it a clean, finished look that feels intentional rather than "I just ran out of cord." Keep the pattern short, around 6 inches of finished length, so guests don't stall out mid-project wondering if they're doing it right.
Designing a Self-Guided Pattern Card That Works Without Staff Help
This is the part most shops underestimate. A bad pattern card means your staff spends the whole event doing one-on-one demos. A good one means guests are genuinely self-sufficient.
Print your card on cardstock, laminate it, and punch a hole in the corner so it can hang at the station. Use step photos, not drawings. Real cord photographed against a light background reads faster than any illustration. Number each step in a large font, at least 18pt, and add a "you should see this" thumbnail at the bottom of each step so guests can self-check.
Include a "stuck?" box in the bottom corner that says something like "Square knot not lying flat? Flip which cord goes over first." That one note alone cuts guest frustration by a lot. I'd print at least 4 laminated copies per station so no one's waiting to see the card while someone else holds it.
Don't try to cram the whole keychain onto one side. Use both sides if you need to. Guests will flip the card. They'd rather flip a card than ask for help.
Supplies
Per station (seats 2 guests at once):
- 3mm single-strand cotton macramé cord (Bobbiny or GANXXET both work; cut into 4 lengths of 24 inches per guest)
- 1-inch metal key rings, silver or brass
- Lobster clasp clips, optional for guests who want a bag charm instead
- 4 laminated pattern cards
- Small scissors (craft scissors, not fabric shears)
- Binder clips or clothespins to hold the ring steady while knotting
Setup supplies:
- Foam board or a cork strip mounted to the table edge for guests to pin their ring while they work
- A tray or lazy susan with cord bundles sorted by color (6-8 color options is plenty)
- A small sign: "Pick your cord. Grab a ring. Follow the card."
Optional:
- Wooden beads (6mm-8mm) to slide onto cord ends before the gathering knot
- Small fabric scissors for trimming fringe
- A "fringe ruler" marked at 1 inch so cord ends are trimmed evenly
Setting Up for High-Traffic Shop Hop Flow
Number your steps, not your stations. One long table beats 3 small tables for traffic flow. Guests move along the table as they work, which feels natural and keeps bottlenecks from forming at the cord-picking step.
Pre-cut all cord before doors open. If you're expecting 30-40 guests across the event, cut at least 200 lengths of 24-inch cord the night before and sort them into color bundles with a rubber band. Sounds like a lot. It takes about 45 minutes and saves you from scrambling mid-event.
Set the cord tray at the entry end of the table and the scissors and finishing supplies at the exit end. Guests naturally move through the station rather than clustering.
One failure mode I see constantly: stations that don't have enough anchor points. If guests can't clip their ring to something stable, they spend the whole time holding it with one hand and knotting with the other. It's slow and frustrating. A strip of foam board with T-pins, or even a row of binder clips clamped to the table edge, fixes this completely. Set up your anchor points before you do anything else.
Tips & Variations
- I always set out a finished sample keychain at the front of the station. Guests pick up their pace when they can see what "done" looks like.
- Swap in jute cord for a more natural, earthy look. 3mm jute from Pepperell Braiding Company is inexpensive and smells pleasantly woodsy, which is a bonus sensory detail guests notice.
- For a holiday version, use red and white cord and swap the key ring for a small ornament loop. Same 4 knots, different hardware, completely different vibe.
- Wooden beads at the fringe end are the most requested upgrade. Keep them in a small bowl rather than pre-stringing them; guests like choosing their own.
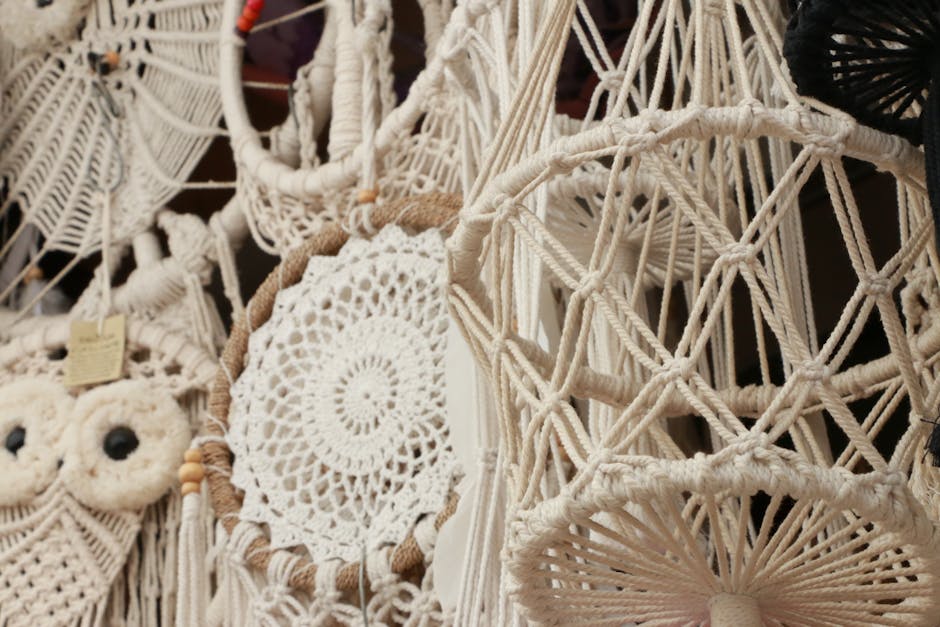
- If you sell home goods, yarn, or any kind of fiber product, tie a small display of related items to the station. A macramé wall hanging nearby, a skein of chunky yarn, even a few woven baskets. Guests who finish and look around tend to buy.
- The gathering knot is where most guests stall. If you see a line forming at the end of the table, that's why. A short 30-second video loop on a small tablet showing just the gathering knot solves it without needing a staff member stationed there.
Why Customers Come Back for This
Macramé keychains are genuinely wearable. Guests clip them to their bags on the way out of your shop, which means every person they run into that afternoon sees it and asks where it came from. That kind of word-of-mouth is hard to manufacture, and a well-designed station makes it happen almost automatically.