Last Updated on May 7, 2026 by admin
What This Is
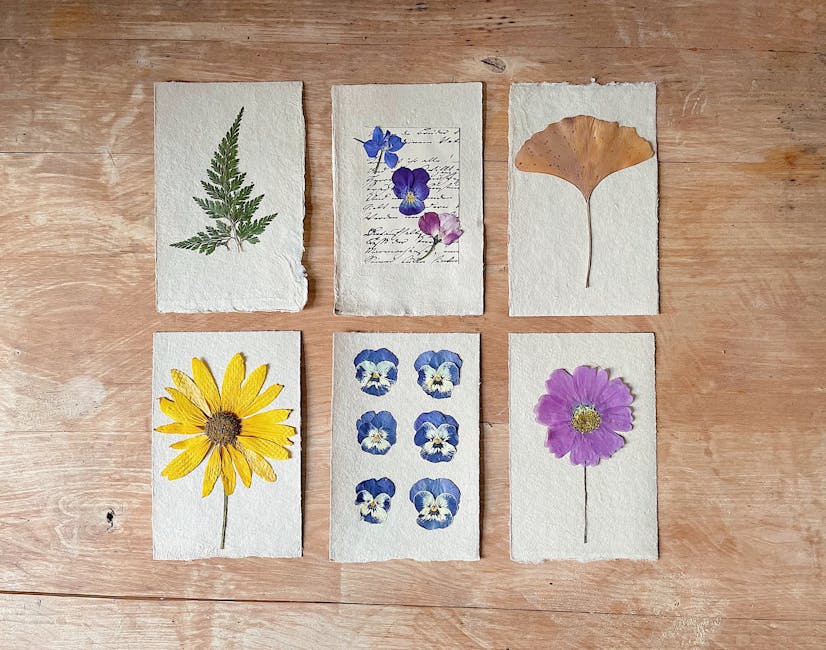
Guests arrange a handful of pre-pressed flowers and leaves onto a card stock strip, then you run it through a laminator to seal everything in place. Done. The finished piece is a functional, genuinely pretty bookmark they take home the same day. It works for ages 6 and up, takes 15 to 20 minutes per guest, and most shops run it in 30-minute windows with no line backup.
Supplies
Per-station setup (serves 8-10 guests before restocking):
- Card stock strips, pre-cut to 2" x 7" (white or ivory — cream shows flowers best)
- Pressed flowers and leaves, sorted into shallow trays by type (pansies, ferns, larkspur, Queen Anne's lace all press reliably)
- Tweezers, at least 4 pairs — guests pick up small petals more confidently with them
- Glue dots or a thin PVA glue in small squeeze bottles (PVA dries clear; glue sticks smear)
- Thermal laminate pouches, 3 mil, pre-cut to bookmark size or standard 2.5" x 9"
- A thermal laminator — the Scotch TL901X handles continuous use and costs under $40
Setup supplies (one-time per event):
- A paper trimmer for cutting card stock quickly (a rotary cutter works too)
- Shallow sorting trays or muffin tins for botanicals
- Small labels for each tray if you're sorting by flower type
Optional but worth having:
- Hole punch and ribbon scraps so guests can add a tassel at the top
- A sample board showing 4-5 finished bookmark styles for inspiration
Setup
- Press your flowers at least 5 days before the event. Flat, low-moisture flowers work best — pansies, violas, and small fern fronds press in 4 to 5 days between book pages or in a flower press. Thick flowers like roses don't press flat in time, so skip them.
- Pre-cut all card stock the day before. A paper trimmer makes this fast; I usually cut 80 to 100 strips for a weekend event and it takes about 20 minutes.
- Sort botanicals into labeled trays the morning of. Five or six varieties is plenty. More than that and guests spend the whole time deciding instead of making.
- Stage the laminator at the end of the table, away from the flower trays. You'll be the one running it — keep it out of reach of younger kids.
- Set out 4 tweezers and 4 glue stations so up to 4 guests can work simultaneously without bumping elbows.
- Put a finished sample bookmark at eye level right at the entry point of your station. Guests glance at it, understand the project instantly, and sit down. That sample does more work than any sign.
Walk-Through for Guests
- Guests pick up a card stock strip and spend a minute just looking at the flower trays before touching anything. Let them browse. That's when the creative part happens.
- They use tweezers to arrange botanicals on the strip — no glue yet. Encourage them to try a few layouts before committing. This is the step where guests often pause for a photo, so leave room on the table for them to hold up their arrangement.
- Once they're happy with the layout, they apply small glue dots or a thin bead of PVA to the back of each piece and press it down. Younger kids may need help here — the petals are delicate.
- Hand the strip to you (or a staff member) to slide into a laminate pouch and run through the Scotch laminator. Takes about 90 seconds.
- The bookmark comes out warm. Give it 2 minutes to cool flat before guests handle it — set it on a small cooling board or just a hardcover book.
- Optional: guests punch a hole at the top and thread a ribbon for a tassel finish. Photo moment right here.
Tips & Variations
- I always over-prep botanicals by about 30%. The first Saturday rush will empty a tray faster than you expect, and resorting mid-event is a mess.
- Fern fronds are your best friend. They press perfectly, they're free if you have any in a garden nearby, and they make even a simple arrangement look intentional.
- Seasonal swap: swap pansies for dried lavender sprigs in summer, small maple leaves in fall. The project stays fresh even for repeat visitors.
- For younger kids (under 8), pre-arrange two or three flowers on the card stock with a light tack before they arrive. They just press them down and add one or two more. It keeps the time under 15 minutes and avoids frustration.
- The most common failure mode: guests over-glue and the flowers slide around inside the laminate pouch before it seals. Fix this by making sure every piece is pressed firmly and dry before laminating. A 60-second wait after gluing is enough.
- If your shop is small, this station fits on a 6-foot folding table with room to spare. You don't need a dedicated craft room — a cleared retail counter works fine.
- Pair it with a painted rock station if you want two simultaneous activities for different age groups. Rocks draw the younger kids; bookmarks tend to pull in teens and adults.
Why Customers Come Back for This
Botanical crafts photograph well, and guests post them. That Instagram or Facebook post tags your shop, shows a finished product, and reaches people who didn't know you existed. A single Make-and-Take Week bookmark station has a longer tail than most in-store promotions — the reminder lives on someone's nightstand every time they pick up a book.