Last Updated on May 12, 2026 by admin
What This Is
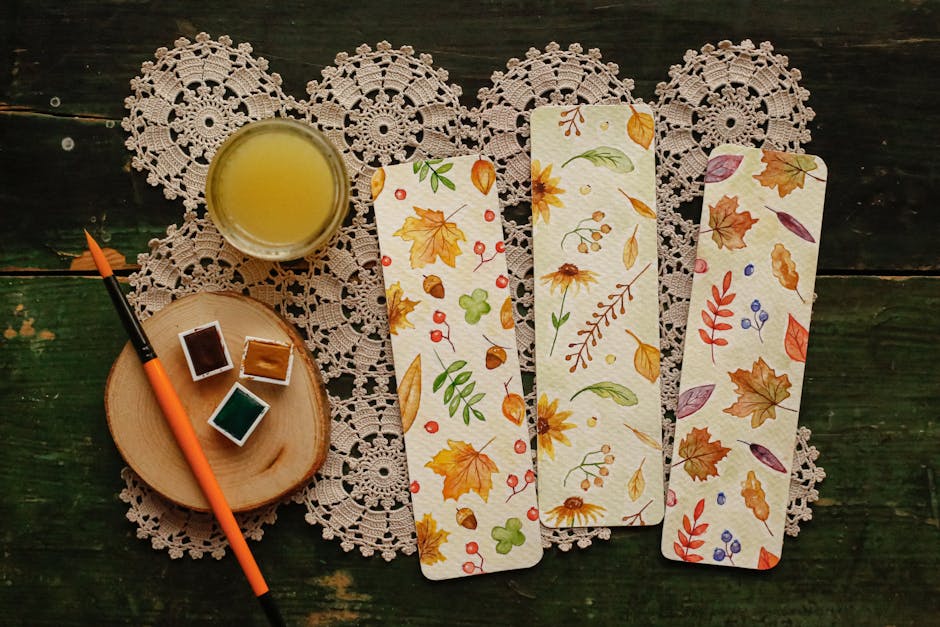
Guests wet a pre-cut cardstock bookmark, drop watercolor pigment onto the damp surface, and watch colors bloom and bleed into each other. No brushwork skill needed. The wet-on-wet method does most of the work, which means a five-year-old and a sixty-year-old end up with results they're equally proud of. Most stations run 15 to 20 minutes per guest, and you can easily cycle 8 to 10 people through per hour at a single table.
Why Watercolor Works Better Than Acrylic for a Drop-In Bookmark Bar
Acrylic paint is great on canvas, but it's a liability at a drop-in station. It dries on brushes in about 4 minutes, it bleeds through thin cardstock, and guests who hesitate end up with muddy streaks instead of something they want to keep. Watercolor forgives hesitation. A guest can put the brush down, chat with a friend for 90 seconds, and come back without losing the piece.
The other thing watercolor has going for it: the supplies pack small. A set of 24-pan Winsor & Newton Cotman cakes fits on a 6-inch square of table space. You don't need cups of water for brush rinsing between every color because light watercolors blend rather than contaminate. That's a real difference when your station table is 4 feet wide and you're fitting 4 guests at once.
If you've already run a mini canvas paint bar and want a second painting option, this is the one. Faster finish time, lower per-guest supply cost, and the age floor drops from about 7 down to 5.
Wet-on-Wet Technique: The One Method That Makes Every Bookmark Beautiful
This is the only technique guests need to know, and you can teach it in 30 seconds. Pre-wet the cardstock with a wide brush loaded with clean water. Then touch watercolor pigment to the damp surface and let it spread. That's it. The water carries the pigment outward in organic blooms that look intentional even when they aren't.
The failure mode I see most often: guests who skip the pre-wet step and apply pigment to dry cardstock. The color sits in a hard-edged puddle instead of blooming. Fix this by having a volunteer or staff member do a quick demo at the start of each session, wetting the bookmark right in front of guests before handing them a brush. Thirty seconds of modeling eliminates about 80% of the "mine doesn't look right" moments.
For color palettes, set out 3 curated options per station rather than the full 24-pan kit. I usually do a warm set (coral, gold, magenta), a cool set (teal, violet, sky blue), and a neutral botanical set (sage, dusty rose, cream). Guests decide faster and the finished pieces look cohesive when they're photographed together for your social media recap.
Pre-Cut Cardstock Shapes and Laminate Options to Offer Guests
The bookmark substrate matters more than most shops expect. You want 80 lb. or heavier cardstock so it holds water without buckling. Pre-cut strips at 2 inches by 7 inches are the sweet spot — wide enough to show off color blooms, slim enough to actually fit in a book. Die-cut shapes (arched tops, pointed bottoms, scalloped edges) photograph better and feel more finished. A Cricut Maker or even a basic craft punch cuts a stack of 50 in about 10 minutes the night before.
For finishing, you have two good options. A thermal laminator with 5-mil pouches takes about 45 seconds per bookmark and produces something that genuinely feels like a product guests could sell. The other option is a clear packing-tape laminate for shops that don't own a laminator: run a strip of 2-inch clear tape down each side, trim the edges, done. It's not quite as polished but it's fast and costs almost nothing extra.
Offer both at your station if you can. Guests who want the premium finish pay a little more; guests with younger kids who just want to get the ribbon on and go pick the tape option. Giving them a choice keeps the line moving.
Station Layout: Keeping Water Cups and Paint Palettes Organized
A messy water cup is the number-one reason guests end up with brown-grey bookmarks instead of the bright colors they expected. Set out two water cups per seat: one labeled "rinse" (dump water, it'll get dirty fast) and one labeled "clean" (stays clear for pre-wetting the cardstock). Mark them with a dot of colored tape so guests don't mix them up. This single setup detail makes a visible difference in finished quality.
Station layout per seat:
- 1 wide flat wash brush, size 12 (for pre-wetting)
- 1 round detail brush, size 4 (for adding pigment drops)
- 2 water cups, labeled with tape
- 3 pre-cut cardstock bookmarks per guest (one to practice on, two keepers)
- 1 shared palette of 3 colors per 2 guests
Keep a stack of paper towels at each end of the table, not at every seat. Guests reach for them naturally and it keeps the center of the table clear. Laminator station goes at the far end so guests flow through in one direction: paint, dry briefly (a hair dryer on low speeds this up dramatically), then laminate and ribbon.
Ribbon, Hole Punch, and Finishing Touches That Elevate the Take-Home
A single hole punch and a bin of pre-cut 12-inch ribbon lengths is all you need, and it transforms the bookmark from a wet piece of cardstock into something gift-worthy. Grosgrain ribbon in 3/8-inch width holds a clean knot without slipping. Satin frays too fast at a busy station where 40 guests are handling the bin. Pre-cut ribbon into 12-inch lengths the night before and store them in a divided tray by color so guests can choose without pulling the whole bin apart.
The finishing station is also your best photo-opportunity moment. Guests holding up their finished bookmark next to the ribbon display makes for genuinely shareable content. Put a small sign there: "Tag us before you leave." A subtle chalk-lettered backdrop or a small floral arrangement behind the station costs almost nothing and shows up in every guest photo. That's passive marketing for the next shop hop.
One last tip: punch the hole before guests paint, not after. Trying to punch through laminate is a hassle, and damp cardstock tears if you rush it. Pre-punched holes save time and prevent the one finishing-step frustration that always seems to happen at 2 p.m. on a Saturday.
Why Customers Come Back for This
The wet-on-wet results look different every single time, even when guests use the same three colors. People genuinely want to try it again with a different palette, which makes this station one of the easier ones to bring back for a second shop hop without it feeling like a repeat.